

One of the best ways to keep malware from infecting your computers is to avoid visiting websites designed to do just that. No one intentionally visits loadmetogetinfected.com, but malware authors employ all sorts of tricks to lure unsuspecting users into viewing malicious sites. Various tools can help, but the easiest free technique is called DNS filtering.
DNS, which is short for Domain Name System, is the Internet technology that maps human-readable computer names like www.apple.com to the numeric IP address of Apple’s server, 17.254.0.91. Every time you click a link to visit a new Web page, your Mac queries a DNS server to learn the IP address associated with the domain name embedded in the link—it all happens seamlessly and instantaneously in the background.
Typically, your Mac will automatically use the DNS servers specified by your Internet service provider. However, you can change your DNS servers manually, and one good reason to do so is to take advantage of DNS servers that look at your Mac’s DNS requests and refuse to resolve names associated with malicious sites. Such DNS filtering is great since it protects you from malicious sites without you having to do anything special. Such sites simply won’t load at all.
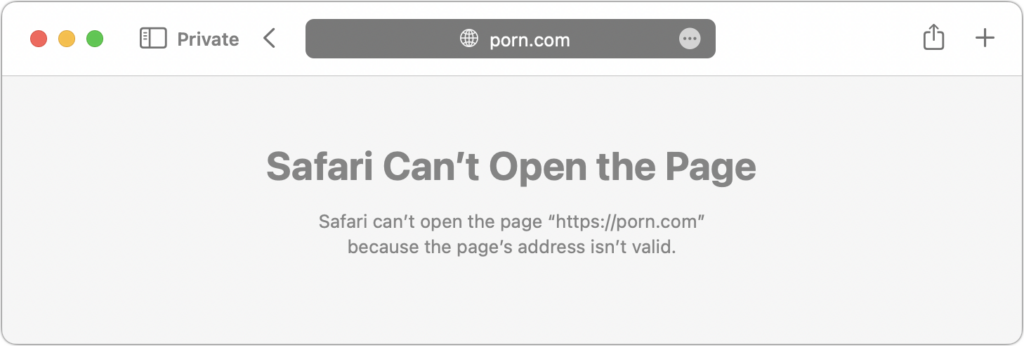
One more thing. DNS filtering can also block porn sites. That’s helpful if you want to avoid accidentally loading adult content or to ensure that those in your office don’t, in order to reduce the chances of a sexual harassment complaint. As with malicious sites, filtered adult sites just won’t load.
Setting up DNS filtering is easy. All you have to do is replace your current DNS server addresses with the IP address of a particular public DNS service—the steps are later in this article. The two providers we recommend are Quad9 and Cloudflare, both of which are free and run by reputable companies. Of the two, Quad9 is more focused on user privacy, but Cloudflare offers additional DNS filtering capabilities that may be useful.
The options are:
- Quad9 malware blocking: 9.9.9.9 with a secondary of 149.112.112.112
- Cloudflare malware-only blocking: 1.1.1.2 with a secondary of 1.0.0.2
- Cloudflare malware and adult content blocking: 1.1.1.3 with a secondary of 1.0.0.3
You should always enter the secondary DNS server in case the primary server goes down. Otherwise, you wouldn’t be able to connect to any sites at all.
However, don’t mix in other DNS servers. If you use Cloudflare’s adult content filter as your primary DNS server with your ISP’s DNS server as a secondary, when Cloudflare refuses to resolve an adult site, macOS will drop down to the secondary ISP server, which will resolve it happily, thus eliminating the utility of the Cloudflare’s filtering.
One final note before you get started. Apple’s iCloud Private Relay service (in beta in macOS 12 Monterey, iOS 15, and iPadOS 15) sends all your traffic through two proxy servers, which prevents DNS filters like Quad9 and Cloudflare from working. That’s unfortunate since iCloud Private Relay is a useful way to hide your IP address and browsing activity from your network provider and the websites you visit. Apple is clear about this limitation, noting in its various DNS server interfaces:
DNS requests are being routed by iCloud Private Relay for this network. Turn off Private Relay to manually configure DNS settings.
If you need to turn off iCloud Private Relay on the Mac, open System Preferences > Apple ID and deselect the checkbox next to Private Relay. On an iPhone or iPad, open Settings > Your Name > iCloud > Private Relay and flip the switch to Off.
Set Up DNS Filtering in macOS
To use DNS filtering on the Mac, follow these steps, which should work in any version of macOS. We’re using Quad9 as the example here, but replace the primary and secondary IP addresses as desired if you want to use one of the Cloudflare filters.
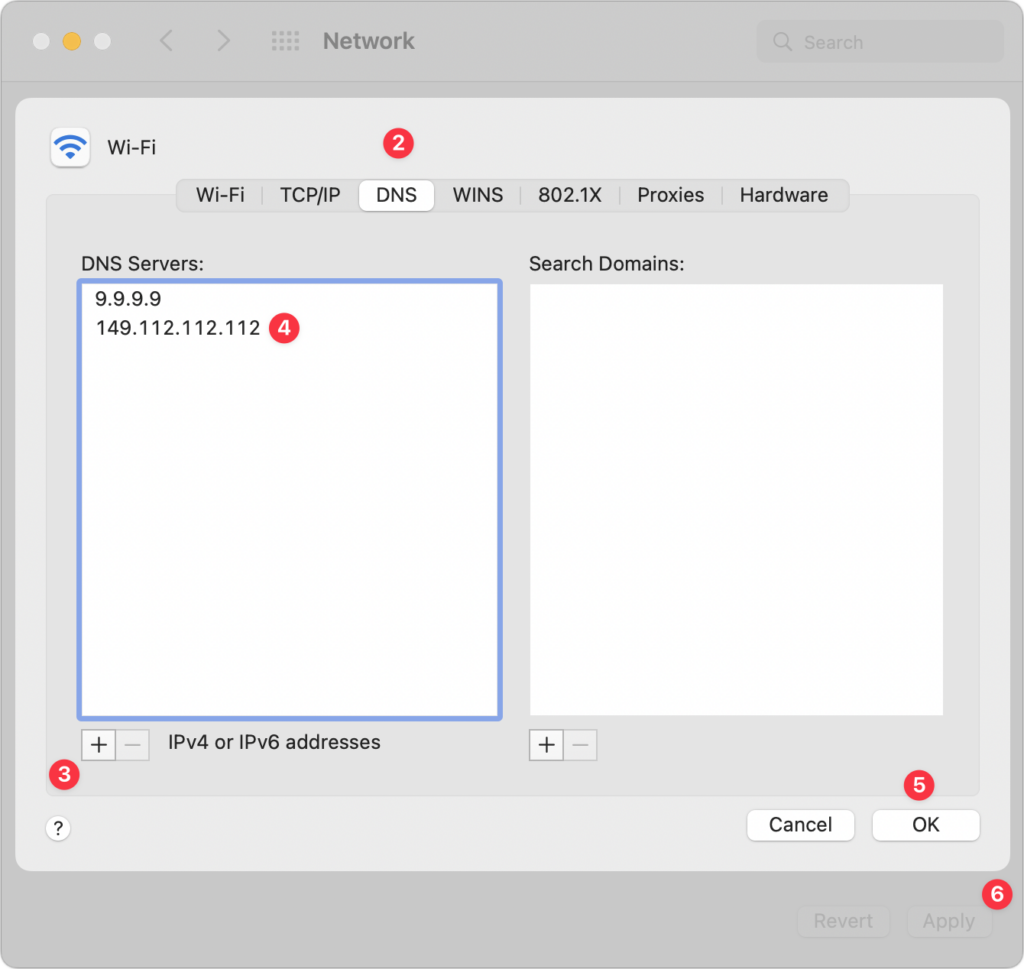
- Open System Preferences > Network, and select the adapter you use (likely Wi-Fi or Ethernet) in the sidebar.
- Click the Advanced button, and in the sheet that appears, click DNS.
- Click the
 button under the DNS Servers list and enter
 9.9.9.9. - Click the button again and enter
149.112.112.112. - Click OK to dismiss the Advanced preferences, and click Apply.
- Close the Network preference pane.
It’s difficult to perform a real-world test to tell if Quad9 or Cloudflare’s malware blockers are active since there’s no way to know which sites they block. However, Quad9 provides a test page at on.quad9.net that should help. If you use Cloudflare’s adult content filter, you can tell if it’s working because your Web browser will refuse to load adult sites.
Set Up DNS Filtering in iOS and iPadOS
The steps for setting up DNS filtering in iOS and iPadOS are a bit different. For this example, we’ll use the Cloudflare malware filter, but again, you should replace the IP addresses below with the filter you want to use.
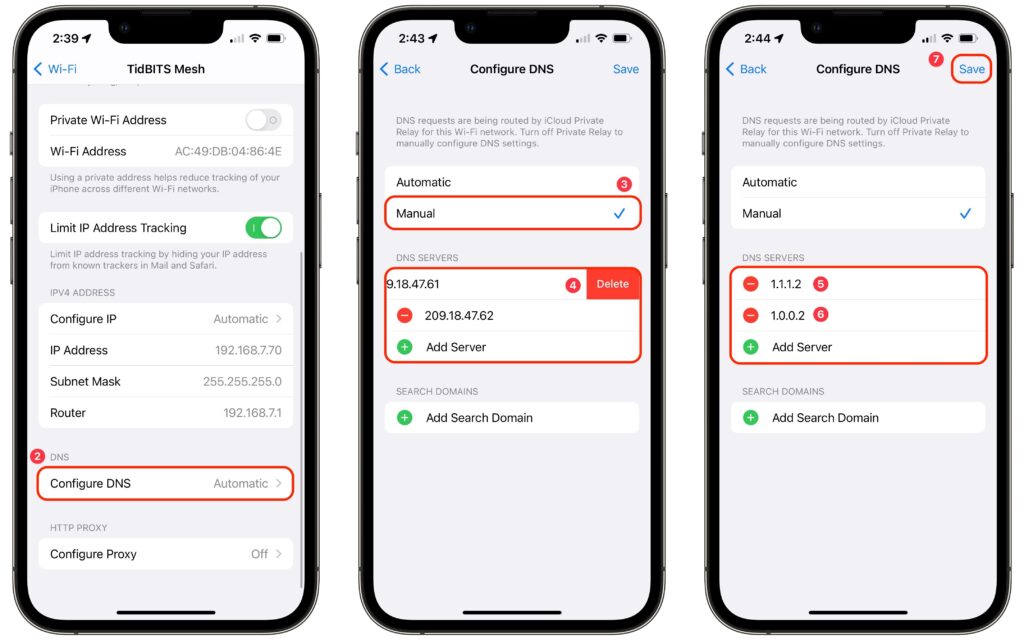
- Open Settings > Wi-Fi and tap the
 button next to your current Wi-Fi network.
 - Scroll down and tap Configure DNS, which is probably set to Automatic.
- On the Configure DNS screen, tap Manual.
- In the list of DNS servers, tap the red delete
 buttons next to any entries there.
 - Tap the green Add Server
 button and enter
 1.1.1.2. - Tap the green Add Server button again and enter
1.0.0.2. - Tap Save in the upper-right corner.
That’s it! You should have no trouble using either Quad9 or Cloudflare, but if you need to revert to your previous DNS servers, it’s easy to do. On the Mac, just delete the manual entries you created—macOS will automatically use the DNS servers provided by your ISP. On an iPhone or iPad, select Automatic in the Configure DNS screen to replace the manually entered DNS servers with those from your ISP. In either case, if you’re not going to use DNS filters, it’s worth turning on iCloud Private Relay. We hope that Apple adds DNS filtering options to iCloud Private Relay so you could additionally choose to filter out malicious sites and adult content.
(Featured image by iStock.com/Funtap)
Dosent filter anything