Two similar-sounding iOS features generate quite a bit of confusion. Wi-Fi Calling and Wi-Fi Assist both aim to improve your connectivity by using the best network available, but they achieve that goal in diametrically opposed ways. Wi-Fi Calling leverages your Wi-Fi connectivity to replace weak or nonexistent cellular coverage, whereas Wi-Fi Assist uses your cellular data connection when the Wi-Fi connection is poor. Here’s what you need to know.
Wi-Fi Calling
Of the two technologies, Wi-Fi Calling is more commonly used and more helpful. It enables you to make or receive a phone call if you have a Wi-Fi connection in an area with little or no cellular coverage. That’s a huge win—cellular coverage in cities often doesn’t work below ground and can be blocked by thick walls in old buildings too. And in rural areas, weak coverage is a common problem. Your wireless carrier must support Wi-Fi Calling for it to work, but most do—check the full list for your carrier.
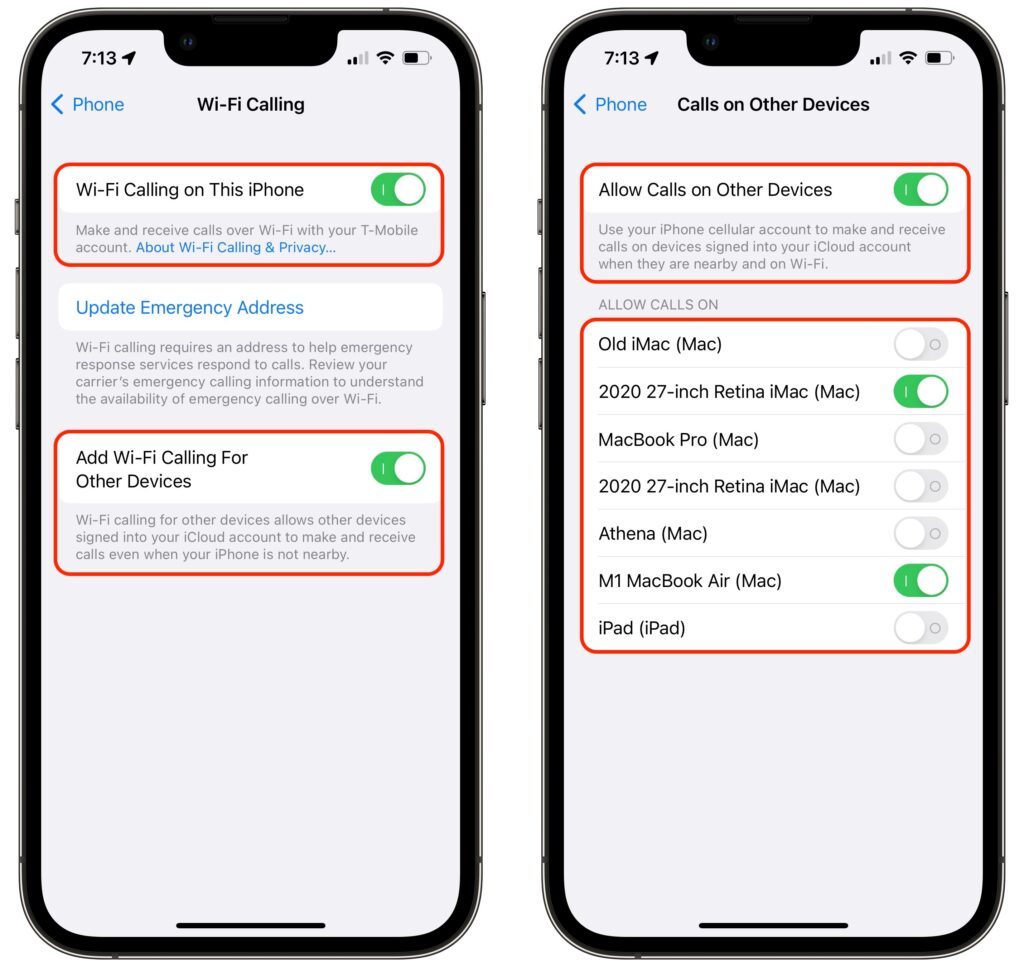
To enable Wi-Fi Calling, go to Settings > Phone > Wi-Fi Calling, and enable the Wi-Fi Calling On This Phone switch. You’ll likely need to enter or confirm your address for emergency services. Normally when you call emergency services, your iPhone provides the dispatcher with your location based on cell tower triangulation; using Wi-Fi prevents that, so the system falls back to your address. For this reason, the iPhone tries to use the cellular network for emergency calls whenever possible. When Wi-Fi Calling is active, you’ll see “Wi-Fi” after the carrier name in the status bar.

The other utility of Wi-Fi Calling is that it lets you take and make phone calls on iPads and Macs that lack cellular capabilities, even when your iPhone isn’t nearby. It’s a little more complicated to enable, requiring the following settings:
- In Settings > Phone > Wi-Fi Calling, turn on Add Wi-Fi Calling For Other Devices.
- In Settings > Phone > Calls on Other Devices, turn on Allow Calls on Other Devices.
- Still on that screen, turn on each device you want to use with Wi-Fi Calling. (Each device must be signed in to the same Apple ID.)

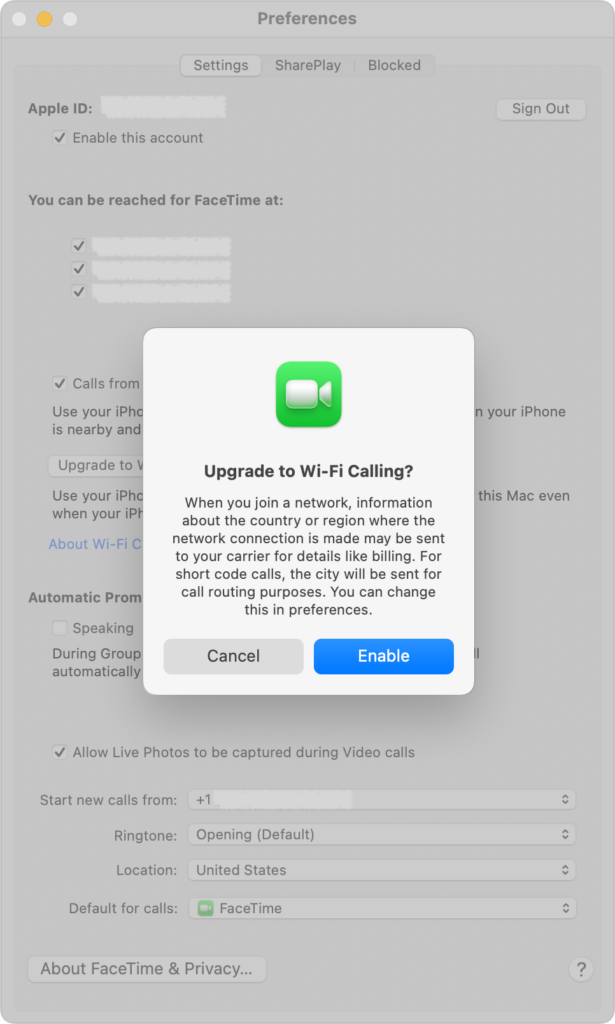
- On your iPad or iPod touch, go to Settings > FaceTime and turn on Calls from iPhone. On your Mac, open the FaceTime app, choose FaceTime > Preferences, then enable Calls from iPhone and click Upgrade to Wi-Fi Calling. You’ll need to approve the action or enter a code on the iPhone to confirm.

Once you have everything set up, calls should come through to all the devices you’ve added, and you can start new calls from the FaceTime app by entering a contact or phone number and using the phone button. The only downside? Multiple nearby devices can announce incoming calls, which may be annoying.
Wi-Fi Assist
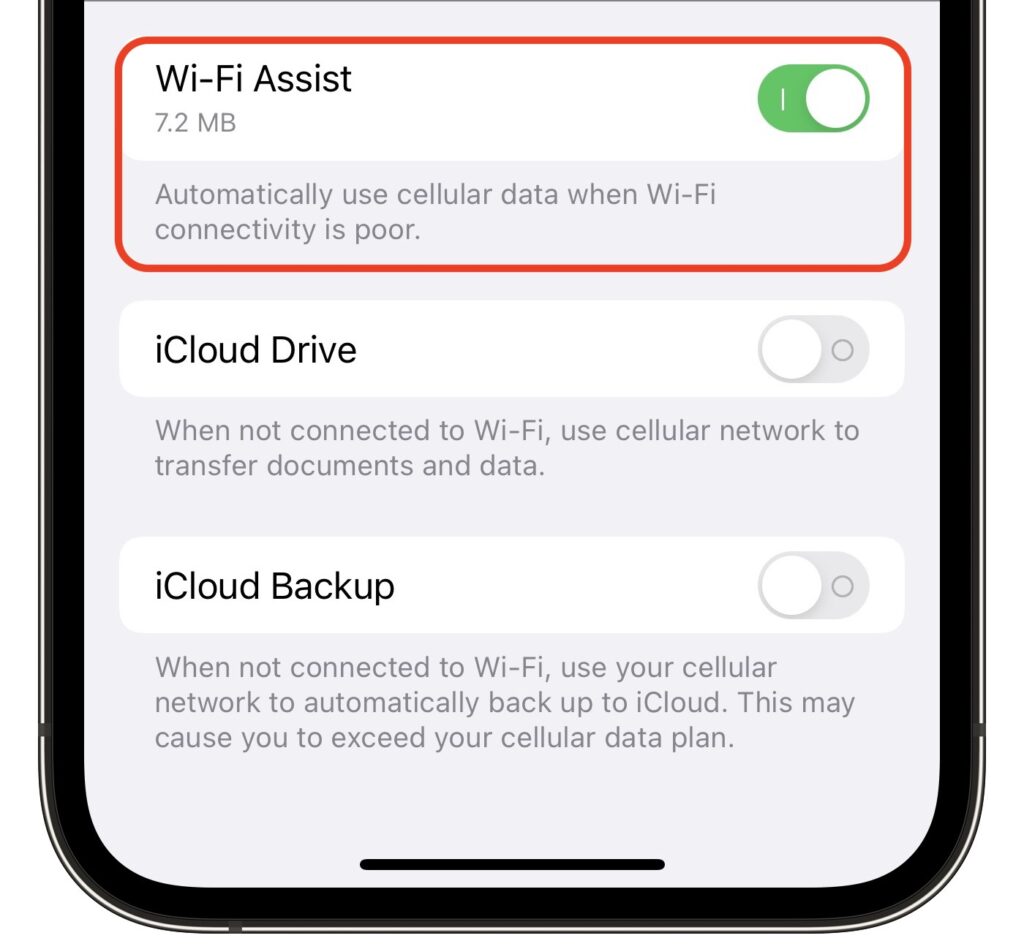
Wi-Fi Assist solves a less common problem than Wi-Fi Calling, but it’s such a useful fix that Apple turns it on by default. In short, when you have a poor Wi-Fi connection to the Internet, Wi-Fi Assist automatically switches your connection to cellular. So, if a Web page doesn’t load or a search in Maps isn’t getting results, Wi-Fi Assist kicks in to ensure the task completes over your cellular connection.
The only downside to Wi-Fi Assist is that you could end up using more cellular data than you expect. That’s likely a problem only if your plan provides extremely limited cellular data or charges significant amounts for additional usage, as might be the case with a pre-paid SIM while traveling. To ensure that doesn’t happen, go to Settings > Cellular, scroll all the way to the bottom, and turn Wi-Fi Assist off. (That screen also tells you how much cellular data Wi-Fi Assist has used; even when it’s on, it’s unlikely to consume much.)

There are a few caveats:
- Wi-Fi Assist won’t automatically switch to cellular if you’re data roaming (using a carrier other than your main one for cellular data).
- Wi-Fi Assist works only with foreground apps, not those that download in the background.
- Wi-Fi Assist doesn’t work with some apps that stream audio or video, or that download significant amounts of data.
In short, Wi-Fi Calling and Wi-Fi Assist are helpful features that attempt to enable your iPhone to work normally for phone calls and Internet-related tasks by switching between Wi-Fi and cellular as necessary to ensure solid connectivity.
Of course, if you have neither cellular coverage nor Wi-Fi connectivity, you’re just stuck and will have to amuse yourself offline for a while!
(Featured image by iStock.com/ipopba)


Super insightful and fresh perspective.
Well explained and easy to follow.
So glad I stumbled upon this.
Looking forward to your next post!
Truly a masterpiece of content.